
A Few Useful Photo Tips
Hearts & Lens has researched a myriad of techniques for creating successful photo shoots with children and adults who may have a disability or serious illness. Shown here are a few examples of tips we know work with winning success. Of course, we also teach that a tip that works on one occasion may now achieve the same results the next time it is used. All this is explained in our thorough training course.


Preparation for a photo session with a disabled person
This "short list" of tips is a brief summary of various points to consider before and during a photographic session with a person who has a disability or serious illness. This list is by no means complete. More extensive guidance can be found in workshop training, digital training, or in the book, Photographing Children with Special Needs.
Anticipate a possibly different photo session experience when photographing a child with a disability. Preparation is the key to success. Depending on the disability, wheelchairs or low levels of communication and other possible less-than-typical behavior may be in play. Prepare to expend more physical and/or emotional energy. On the other hand, a photographer's experience may be also exceptionally grand. One photographer said, "I left the home feeling like I was walking on a cloud."
Learn about the child and the disability prior to a photo session. But concentrate on the individual rather than the disability. Find out as much as possible about how the child communicates, if props can be used, level of ability to sit or stand, etc. Interview the parent and, if possible, the child. This will save time in the long run and also make your job a lot easier as well in order to provide superior results. Spend time with the child before the photo session to let them understand that you are no stranger to the family, allowing them to witness a friendly interaction with the parent prior to the shoot.
Allow more than normal time for a session. However, sometimes it may be necessary to work faster than normal because of the child's short attention span or physical limitation. The ideal venue for an a-typical child may be in their own home or outdoors (to allow for freedom of movement and natural lighting, but not full sun). Understand, however, that children with disabilities may be more sensitive to heat or cold.
Work quickly but have patience. Confusing? Children with disabilities may have unexpected behaviors that will require patience (on both sides of the camera). They may be easily frustrated and tire before you accomplish what you had planned Try to accomplish your primary objectives first. If necessary, reschedule before everyone is totally "spent."
Explain to the child what you will be doing and ask or alert the child first before you attempt any interaction. Be careful about contact; some children do not like to be touched. Don’t use food as an incentive unless encouraged or provided by the parent.
Relinquish control. Prepare to let the child take the lead (but not control). Many children may not be able to smile on demand or pose in a certain way or even look at the camera. It may be necessary to remove the camera from the tripod and hand hold it. If the child is able, allow him to hold a personal object that provides comfort or holds attention. Consider the household pet as an good buddy for the photo.
Be flexible. Prepare to alter or put aside some of your normally favorite and "proven" technical approaches for a session. Use a faster speed to capture unanticipated movement. Flash is not recommended, but consult with the parent. A 70-200mm lens is recommended for staying out of the child's immediate personal area. An 85mm lens is also an option.
Use a camera baffle to hide you and your camera and also attract attention.
Try to capture the spirit of the subject. Rather than striving to achieve the ideal pose and smile, relax and follow the child’s lead and movements. Be quicks to click the shutter when the child shows emotion or interest.
Prepare studio and equipment. Clear the path of cables, cords, and objects that could obstruct the child’s path. This must be done for the safety of the child as well as for protection of your equipment. If on location, be sure to check it out ahead of time to evaluate lighting for time of day, placement of your subject, background and angles. When photographing in the family home, maintain a short depth of field in order blur background distractions (unless part of the story).
If a background or 10 x 20 drop cloth is used, allow for plenty of movement of your subject. On the other hand, many children may be more comfortable on the floor. Work with the parent ahead of time to consider the best options.
Lighting? Natural filtered light is best. Sun is not good. Allow enough speed on camera setting for continual or unanticipated movement. Continuous daylight balanced lighting in a soft box has had proven results when indoors.
These are only a few suggestions. Accreditation with Hearts & Lens may be achieved upon completion of the H&L training available for purchase on this website. There are many advantages that come with accreditation through Hearts & Lens nonprofit organization. It is understandable that there is considerably more to be learned about photographing persons with disability or serious illness than is contained on this page.
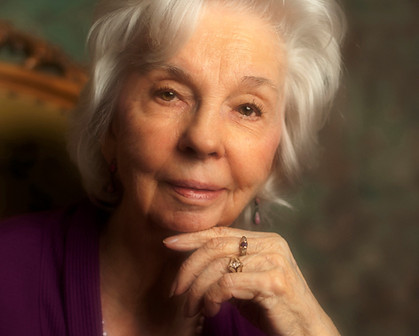
Preparation for a photo session with a senior citizen
Our best, most pertinent advice is, "Don't delay!" If your subject is a close relative or elderly neighbor, or friend, book that photo session as though it is a priority. The time to think "lovely portrait" is NOW. As they say, "There is no time like the present."
Formally pose or candidly capture the subject while engaging them in conversation. Suggested topics: family history, stories from youth or favored era, sports or hobbies, loved ones (living or not), feelings, etc.
Lifestyle photos are great. Capture what they do, whether in the home, garden or playing pickle ball.
Fill the frame. Facial lines can be important markers. Nevertheless, a softening of those lines may be appreciated. Softening can be done by applying Gaussian Blur in Photoshop or decreasing clarity in the RAW (both Photoshop and Lightroom have the same RAW editing engine). TIP: Even if working on a jpg file that is not RAW, the RAW editor can be accessed by clicking on the top "filter" menu and clicking on the RAW editor.
Capture expressions. Engage in enough conversation to allow the subject to forget the presence of the camera.
Focus on the eyes unless inspired. Don't forget to include detailed shots of hands, etc.
Natural light may be the primary suggestion as preferred lighting. Please no on-camera flash. Modified studio lighting should be used with skill. A soft key light in front of subject will de-emphasize wrinkles (if deisred).
Black and white conversion for the finished image is often preferred for elderly subjects, especially if clothing choices do not provide desired expectations. Untraditional special effects such as "lomography" can be applied (free tutorials available on the Internet) in post-processing. Contemporary experimenters may be excited about using modern techniques, but they are not usually appreciated by traditionalists in the aging community.
If using desaturation for creating black and white, try only 90-95% and leave a small amount of color in the image. Wonderful results can be obtained by using NIK software's "Silver Effects" setting.
Keep the camera at a distance by using a 70-200mm, 85mm or 24-70mm lens. Your subject will be more relaxed by not having a camera directly in their face.
Glare from glasses may be addressed by tilting glasses above the ears (but not too much) or slightly tilting the head down (or up).
Have subject gently lean on arm of chair to create slightly tilted shoulders.
If possible, go in advance to the actual session location to check posing options and lighting.
If in a care facility, check to see if the caregiver is open for you to arrange hair and make-up services.
Tips page sponsored by
Logo here